Topic: Win 7 FOG deployment with SAD2
Hi there,
Massive thanks to everyone responsible for the SAD2 tool. You know who you are! (Mr Smartepants)
"Except otherwise noted, the open-source code of the DP_Install_Tool.cmd file is © 2011-2012 by Erik Hansen for DriverPacks.net, under a Creative Commons Attribution-ShareAlike license: http://creativecommons.org/licenses/by-sa/3.0/.
7-Zip is open source software by Igor Pavlov. Most of the source code is under the GNU LGPL license. The unRAR code is under a mixed license: GNU LGPL + unRAR restrictions. Check license information here: http://www.7-zip.org/license.txt or http://www.gnu.org/licenses/lgpl.html
DPInst.exe is proprietary code owned completely by Microsoft and distributed under their own license. (see .\bin\*\dpinst-license.rtf)"
I made a guide on Deploying Windows 7 from FOG- and some people from here have asked me for more details so I thought I should post it here. You can download the PDF from the FOG forums at the bottom of the first post. Or read below!
http://fogproject.org/forum/threads/win … #post-1639
A few people here mentioned they were interested in this so I though I'd post my guide to Win 7 FOG deployment here.
You can download a PDF of the document, it's formatting is nicer, and has nice RED warnings and comes in just over 4000 words. I tried my best to keep it concise. Download from the bottom of the first post here:
http://fogproject.org/forum/threads/win … #post-1639
WINDOWS 7: Deploying to Any Machine with FOG- STEP BY STEP


Introduction
Windows XP is still very dominant in the IT world. Extended support and the failure of Vista has meant many organisations have not even considered windows 7 yet, added to this managers see windows 8 on the horizon and the PR machine is in full force. I personally believe it would be a mistake to try and move to win 8 from XP.
That said XP still has support until 2014 and for much older hardware still makes more sense. By the time support ends, any hardware still worth running XP on will be worthless.
If you are reading this then like us you still deploy XP from FOG as your main OS for machines and you probably have a really nice unattended SOE that deploys to any machine. So what do you do for windows 7? Microsoft has come to the table with their own imaging solution- MDT (Microsoft deployment tools).
There is a problem though, you can't have FOG and MDT on the same network. Added to this MDT is very complicated to setup and the actual process is very convoluted, compared to FOG. One thing MDT has is good documentation, and lots of answers to problems on the internet because it is used by so many compared to FOG.
So can you just continue to deploy XP SOE for older machines and build a Windows 7 SOE too? Yes you can! And I will show you how, including several customizations. It's not difficult- but right now I don't believe there is sufficient documentation for windows 7 FOG deployment, I had a few problems during my process and I will point them out as I go.
Note: I am no expert! The following is just the way I have deployed Windows 7 in our environment. I'm not saying it is the only way or even the right way to do it. But this way works, as demonstrated by others and is totally unattended. I'm still at the testing phase at the moment and no doubt will find things I need to change. I will update them in this guide as I find them.
What you need- Basics*
a) Some time. Don't expect to get it right the first, second, or third time. One thing you should do is document your entire process. It's not hard to have a text document open while working and detail what you have done as you go. Plus if your boss asks you what you've been doing you can show him!
b) Virtual computer software. I used VMware workstation 8, I recommend this and will be detailing the guide using workstation 8. You can download a free trial from the VMware site:
https://www.vmware.com/
c) Windows AIK tools (automated install kit)- We only need Windows system manager from this:
http://www.microsoft.com/download/en/de … px?id=5753
More info on AIK: http://technet.microsoft.com/en-us/libr … S.10).aspx
d) An ISO or DVD with windows 7 on it. For this guide I will be using Windows 7 Professional, because all our new machines come with licenses already. I will be making both an x64 and x86 SOE.
e) An external HDD or a large spare internal for the virtual machines. If external I suggest using a fast connection like esata.
d) The best physical machine you can get- dual core minimum- quad core is better, and 8GB ram.
Note: *There will be some other utilities needed along the way
Step 1: Deciding on what you want
Initially I only sought to build an x64 version of windows- however I found once I got to the drivers stage that, yes surprisingly old hardware has x64 CPU support, however x64 drivers do not work well..at all. I will elaborate on this point at the drivers stage.
So in this write up I will be making both an x86 image and an x64. The only difference between the two in terms of the build is the drivers stage and of course the initial installation on the virtual machine (VM). So I will continue this tutorial detailing one build, but where the two differ I will point that out. I recommend building both at the same time so you apply changes etc to both.
Step 2: Creating the Virtual Machines
From the VMware menu, select File>New virtual Machine- select custom then next. Leave hardware compatibility as Workstation 8.0- Next.
Choose "I will install the operating system later"- Next.
Set Guest operating system as Windows 7- Next. Then name your virtual Machine. Call one Windows 7 SOE x64- call the other Windows 7 SOE x86- Next. * you can only build one virtual machine at a time.
Set the cores to two as below- Next.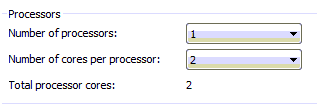
Give your VM 2GB of RAM if you can, or minimum 1GB- Next.
Make sure you choose "Use bridged networking", to ensure PXE boot works correctly- Next.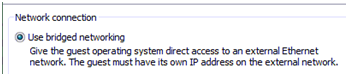
Leave the I/O controller as LSI logic SAS- Next.
Choose "Create a new virtual disk"- Next.
This step is IMPORTANT. Make sure you choose the disk type as "IDE". I found that FOG will NOT upload virtual machines with SCSI drives- which is actually what VMware recommend.-Next.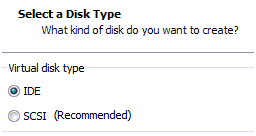
I suggest setting the disk size of 60GB. - Next- Next- Finish. Your Virtual PC is now built, but not powered on.
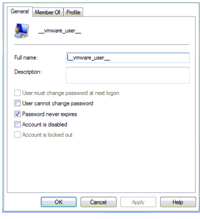
Now is a good time to register the client machines in FOG. It is better to do this before you begin building the image. NOTE: I found that in order to PXE boot the virtual machine, I had to create a new local user on my physical machine.
Type "lusrmgr.msc" into run and the choose users. Create a new user called "__vmware_user__" with the underscores. Do not set a password. Add them to the local administrators group.
You should now be able to PXE boot to your menu. Perform a full registration of the host.
Only set the computers name- and host OS if you have this set (windows 7)- leave all other options blank.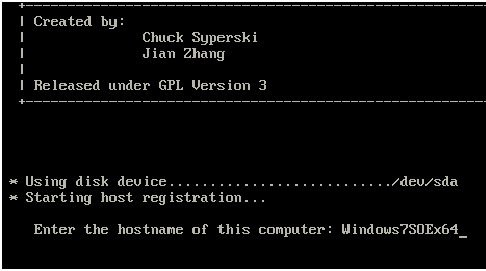
The machine will reboot, it will attempt to boot from C:\ but no OS exists. Power the machine off again. The machine should now exist in FOG. 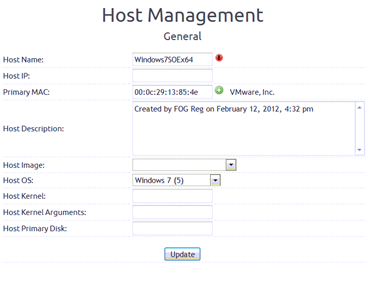
Step 3: Installing Windows and entering Audit Mode
In VMware while the machine is off- Choose "Edit virtual machine settings"
Select CD/DVD device, then either point the machine to a physical DVD drive with win 7 in it, or directly to an ISO file. There is no need to mount the ISO if you have one. I'm using an ISO. You can download win 7 ISO's from this page: http://www.mydigitallife.info/windows-7 … e-premium/ or from TechNet if you have a subscription.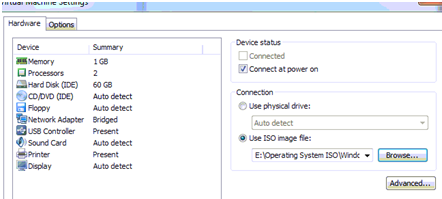
Power on the VM. It will start installing Windows 7. Choose your language/time/keyboard input: Next.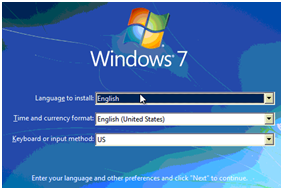
Note, the Virtual machine may seem to lag until you have installed VMware tools.
Choose "Install Now"- Accept the license terms and hit- Next.
Choose "Custom"- Select your one and only disk and hit Next.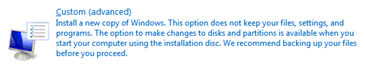
Windows will now start installing. This may take some time. After it has installed, Windows will reboot.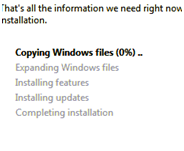
THIS NEXT STEP IS IMPORTANT, SO READ CAREFULLY!
When the machine comes back up- DO NOT go any further. Do not name the machine etc. At this screen: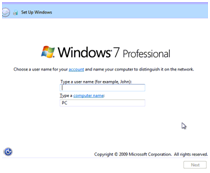
Press CTRL+SHIFT+F3. The machine will reboot and go into Audit mode. Once back up the Machine will auto log on as a local administrator with no password set. You are now in Audit mode, and it's time to take the first of many Snapshots!
From VMware, right click the machine name and choose: Snapshot> Take snapshot. Be sure to give a brief description so you will know where you were if you need to go back. It is hugely important to utilize snapshots during this win 7 build process, I can't stress that enough. If you make a change that stuffs something up- you can always revert to beforehand.
I suggest to then install VMware tools. From VMware menu, choose "VM> Install VMware tools". Follow any on screen prompts from the virtual machine. After installed take another snapshot. This is useful because it improves mouse interaction and allows you to drag and drop files to the VM from your physical machine.
STEP 4: Making an unattend.xml
Now we are going to create an answer file. What you do here will vary depending on what you want automated. An answer file is responsible for automating the setup stage of windows 7 once deployed to a machine from FOG. This part is difficult to write a tutorial for, as it is complicated to explain- but is actually very simple once you have looked into it for a while.
You should have downloaded AIK tools and installed. From your physical machine start menu launch "Windows system image manager".
NOTE: If you need more detailed information on the Answer file process check here:
http://technet.microsoft.com/en-us/libr … spx#BKMK_1
You will need to have your .ISO or win 7 DVD mounted/inserted. Choose "File>Select windows image". Choose the win 7 DVD iso. You now need to choose a .clg file. In this case choose "install_windows 7 PROFESSIONAL.clg"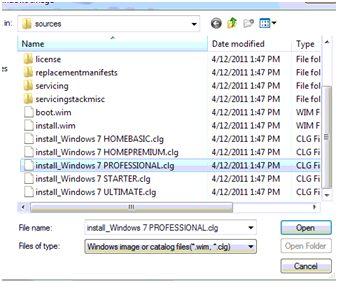
What this does is give you the "catalogue" options for that version of Windows 7.
Now make a new answer file. Go "New> Answer file". Be sure to save this now- call it "unattend.xml".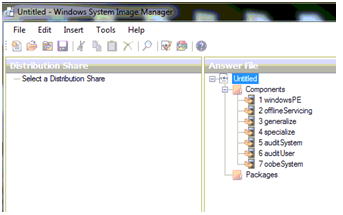
IMPORTANT: If you are making an X86 and X64 version, you must make two different answer files. Make one after the other. You will need to unmount the first DVD and then select the other, and re open the .clg catalogue files as explained above. I suggest making a folder called "unattend files"-then making one sub folder for your X86 and one for your x64. Note the difference between 86 and 64: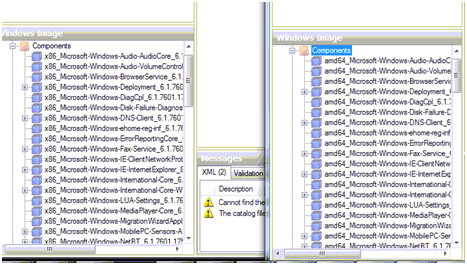
Now basically you can add "components" to the file, by dragging and dropping things you want into the answer file. I will detail what I have added to my answer file- you may want to customize your own further.
1) Windows PE
Add "x86_Microsoft-Windows-Setup_Nuetral" or "amd64_Microsoft-Windows -Setup_neutral".
Set "Use ConfigurationSet to "true".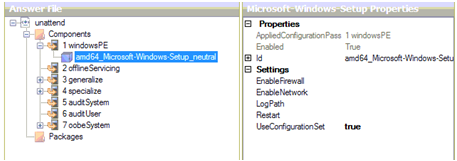
3) Generalize
Add "x86_Microsoft-Windows-Security-SPP_neutral" or "amd64_ Microsoft-Windows-Security-SPP_neutral"- Set value to "1". This will skip the windows licensing program.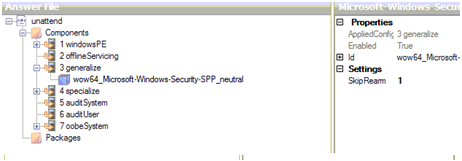
4) Specialize
Add these three components. Substitute x86 or amd64 depending on which answer file you are doing.
a) _Microsoft-Windows-Deployment_Neutral
b) _Microsoft-Windows-Security-SPP-UX_Neutral
c) _Microsoft Windows-Shell-Setup_neutral
Like so: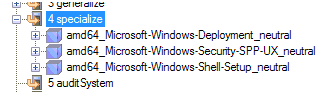
I will now show what to add for each above component.
a) _Microsoft-Windows-Deployment_Neutral
Right click and "Insert new Runsyncronouscommand".
Set the options below. This will activate the built in administrator account during setup.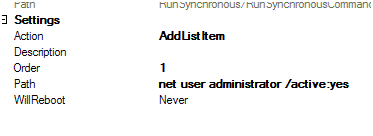
b) _Microsoft-Windows-Security-SPP-UX_Neutral
Set to "true". This will skip automatic activation.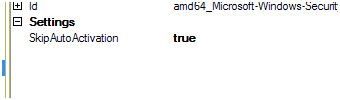
c) _Microsoft Windows-Shell-Setup_neutral
I set computer name to "RENAME"- Fog will rename when first logged on, or you can do it manually.
Set copy profile to "true"- this will copy your administrator account profile as the default profile for other users, including domain users.
You can put a dummy product key in to make sure it skips this during setup. You can set the real license key later. A full list of keys is below.
Operating System Edition
Product Key
Windows 7
Windows 7 Professional
FJ82H-XT6CR-J8D7P-XQJJ2-GPDD4
Windows 7 Professional N
MRPKT-YTG23-K7D7T-X2JMM-QY7MG
Windows 7 Enterprise
33PXH-7Y6KF-2VJC9-XBBR8-HVTHH
Windows 7 Enterprise N
YDRBP-3D83W-TY26F-D46B2-XCKRJ
Windows 7 Enterprise E
C29WB-22CC8-VJ326-GHFJW-H9DH4
Set "show windows live" to False.
Set your time zone.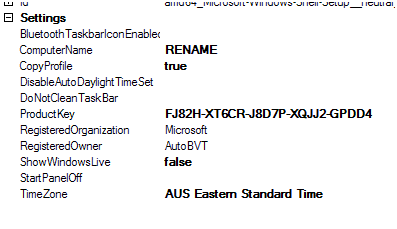
7) OOBE System
a) _Microsoft-Windows-International-Core_neutral
Set your language settings here, mine is for En-Au (English:Australia)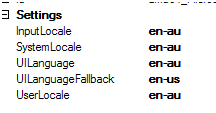
b) Microsoft-Windows-Shell-Setup_Neutral
Under "autoLogon" set enabled to: true (this will set windows to automatically log on after imaging)
Set logon count to 3 (this means it will automatically log on three times to the local admin account after deploying image from FOG)* I have since dropped this to 2, because I've found I don't need 3 for my setup.
Set username to "administrator"
Then add the administrator password also.
Under "OOBE" set the options as follow:
Under "User account" set the administrator password.
Now you need to add something extra here to the Shell setup. Go back to components and to the Shell setup neutral component. By default, shell setup won't add local accounts as an option. You have to drill down like below then drag local accounts across under shell setup.
Now configure the local administrator account as below: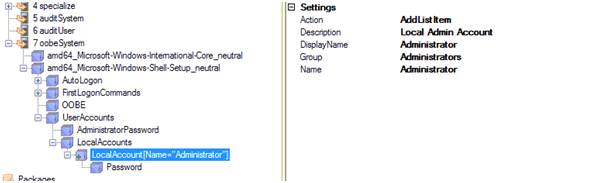
..and don't forget to set a password. This will be the account windows uses to log on the first time after install.
Ok that's it for the unattend file. As mentioned above make sure you have a x86 and x64 unattend.xml if you are making both SOE.
Step 5: Customizing windows installation- Free for all
Ok this section is really up to you. Here you can make any changes you want to windows for when it is deployed. I will list some of the things I have done to give you an idea of what you might like to do. I'm sure you will come up with your own idea for how you want to customize windows 7. I suggest making snapshots as you go along.
Installed VNC 1.0.9 set password - This allows us to remote control machines across the network for support reasons.
Enabled Remote desktop (windows)- As a backup to VNC.
Added Sysinternals
Upgraded IE to 9
Disabled System restore- Not needed, FOG is our system restore ![]()
Set boot animation custom- I made my own custom windows boot animation- I animated our company logo- instead of the normal win 7 startup animation. It's not hard to do, and you can download a neat tool to do it very easily here:
http://www.coderforlife.com/projects/win7boot/
Your animation has to be 105 frames long- and it is 7 seconds long- running at 15/fps. The first 4 seconds play then the last 3 seconds loop until the machine starts up.
IMPORTANT NOTE: Some third party tools like can really ruin your day- I used another program to change the startup sound for win 7 and after a lot of trouble shooting figured out it was the cause of a problem I was having where the imaged machines were not working properly. That said I have fully tested the above boot animation changer tool and it works flawlessly.
Set Desktop background
Set win 7 basic theme as default
Set log on backgrounds in regedit- Here you can create custom logon screens. This is the screen before you logon. You can make one for each common resolution- and also set a default background for when it can't find the right resolution.
1) Start registry editor (Start>Regedit)
2) HKLM\SOFTWARE\Policies\Microsoft\Windows\System
Click on background- and Create a new 32 bit DWORD called "useOEMBackground". Set the value to "1".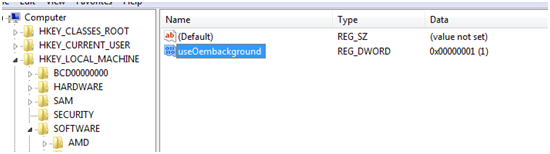
Now you have to create the folders in C:\Windows\System32\oobe\info\backgrounds
Now place all of your background files in that folder. You have to name them in this fashion:
background1024x768, background1920x1080 etc. The images you make should be the correct dimensions or they won't work. Also they can't be over 250 kilobytes or they won't work. I use Photoshop's save for web feature which cuts the size down of images greatly.
Now users will see a custom background when they get to the log on screen.
Set a few local accounts for our company that we use
Set default user account picture
Local Group policies
Load specific theme
Prevent users changing theme (can still change background/window colours etc)
Allowed users to install print drivers/usb hub drivers
Set screen to 15 min Lock out
Prevent changing screen saver/password on wake up
(SECPOL) Behaviour of the elevation prompt for admins in admin approval mode: Evaluate without prompting
(SECPOL) Interactive Logon hide last user
(SECPOL) Switch to the secure desktop prompt for elevation: disabled
Windows Defender off
Power options: never turn off hard disk
Remove windows media centre
Turn off all warning messages in windows action centre
Set OEM information via regedit- Here you can customize what it says when viewing system properties. You can do this via a regedit. Just copy and paste the below into a .reg file and edit the field I mark in red.
Windows Registry Editor Version 5.00
[HKEY_LOCAL_MACHINE\SOFTWARE\Microsoft\Windows\CurrentVersion\OEMInformation]
"Manufacturer"="Kramerica Industries"
"Logo"="C:\\Windows\\System32\\oemlogo.bmp"
"SupportHours"="24/7"
"SupportPhone"="555-5163"
"SupportURL"="http://www.overclockers.com.au/"
You also need to create a .bmp file in the location C:\Windows\System32\ called "oemlogo.bmp", it should be no bigger than 115x115 pixels.
Recuva
Speccy
X64 ICON RESTORER
CCleaner
Windows Updates- We pointed our image to our WSUS server, and installed as many updates as possible before upload.
Again, the above is just an example, you don't have to follow these steps if you don't want- that said I will make a couple of exceptions and say that the secpol (secpol.msc) changes really are necessary and you should do them. If not you can cause problems with snapins prompting for approval, instead of being fully unattended.
Step 6: An important thing to do
Now you need to place your unattend.xml file in it's location. This location is the same for both x64 and x86 images:
C:\Windows\System32\sysprep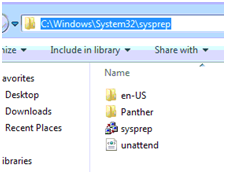
Your unattended file will be processed during sysprep.
Step 7: First log on script- This is important!
After FOG has imaged your computer and setup has run, windows will run a script that we will now make. You need to make a folder called "scripts" in the C:\Windows\setup\ directory: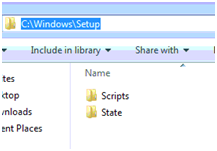
In the scripts folder you need to create a .cmd script called "setupcomplete.cmd". Copy and paste the below into this script.
:::::::::::::::::::::::::::::::::::::::::::::::::::::::::::::::::::::::::::::::::::::::
@echo off
del /Q /F c:\windows\system32\sysprep\unattend.xml
del /Q /F c:\windows\panther\unattend.xml
START C:\Drivers\SAD2-111118\DP_Install_Tool.cmd
Exit
:::::::::::::::::::::::::::::::::::::::::::::::::::::::::::::::::::::::::::::::::::::::
This script will perform three critical things: It will delete your unattend.xml file from the original location and the location it is copied to during sysprep, and it will also call the wonderful SAD2 driver install tool to run. I will explain more about the SAD 2 drivers tool in the next step.
Step 8: Drivers- SAD2
This topic is one that will no doubt cause some to interject with their own way of doing drivers. That's fine, however I spent quite some time trying to find the best way to inject drivers to win 7 installs. Most ways are clumsy and require more work than it's worth. I've settled on this path and it works great for our situation, across any machine.
Essentially after install on first logon, the "setupcomplete.cmd" script will call the "SAD2" driver tool to run. The SAD2 driver tool was made by community members of the driverpacks.net forums.
http://forum.driverpacks.net/viewtopic.php?id=5336
You can download it from the above forum link. I'm using version 111118.
This is what SAD2 looks like: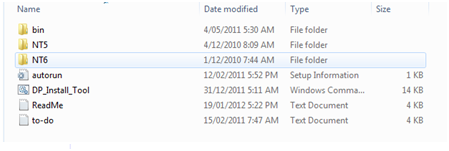
You need to create and then save the folder to:
C:\Drivers
or else you need to adjust the setupcomplete.cmd script in step 7 to where you place the tool.
Now for the drivers you need to go to driverpacks.net:
http://driverpacks.net/driverpacks/latest
And download all of the packs you want for win 7/vista x64. Do the same for x86 vista/7.
Once you have downloaded the driver packs (you don't need to extract them), place them in the respective folders for each image: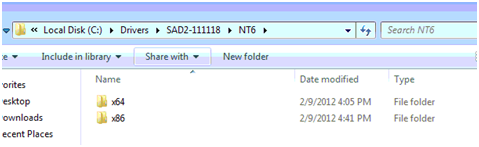
So in the x64 image you only put the 64 bit drivers into the x64 folder, and for the x86 image you only put the 32bit drivers into the x86 folder. This will add only approx 1gb to the final size of the OS partition if you use all packs. We only use core driver packs.
I made a few changes to the "DP_Install_Tool" to make it fully unattended, and also so that it restarts after the drivers have been installed, and deletes the driver packs from the image. I will attach the modified tool to the original post in this thread, so you can just download and replace it in your SAD2 folder, but essentially I just removed the prompt that asks you if you want to proceed, and removed and pauses after that also. Then I just added:
::::::::::::::::::
shutdown -r -c "Drivers Installed! Machine will now restart.."
START C:\Drivers\SAD2-111118\RemoveD.cmd
EXIT
::::::::::::::::
..to reboot the machine after drivers have installed, and delete the drivers. You will need to create a "RemoveD.cmd" script in the location as specified above. The SAD2 tool creates a folder called "D" in the C:\ root , so I added this script to both delete the "D" folder, and the drivers to clear up some room. The .cmd script is below:
:::::::::::::::::::::::
@ECHO OFF
rd /s/q C:\D
DEL /F /S /Q /A "C:\Drivers\SAD2-111118"
rd /s/q C:\Drivers\SAD2-111118
EXIT
:::::::::::::::::::::::
I suggest creating another snapshot and testing that the tool runs correctly. You can also try the tool out on a physical machine to make sure it is working for you. I have fully tested this and it works every time. This is also the reason why it's good to have a x86 version of your image, because as I mentioned although even an old P4 processor can handle x64 OS, if you try to inject x64 drivers it can cause big problems. So I suggest if the machine you are imaging is less than 12-24 months old, then go for x64, if it is any older then use x86. Really the only reason you might want x64 is for the machine to use more than 4gb of ram, and most machines that have 4+gb ram are less than 24 mths old anyway.
Step 9: FOG service and sysprepping/fogprepping
Now the final steps should be to:
1) Install the FOG service, navigate to:
http://fogserver/fog/client/
And install the FOG client service. [BE SURE TO REPLACE YOUR "Hostnamechanger.dll" or your machine won't rename and add to domain after imaging". Replace this after FOG client is installed.
2) Download and Run "FOG Prep"- This is important for uploading windows 7 machines.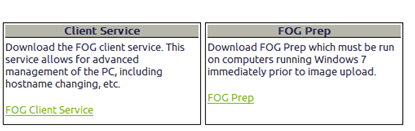
The virtual image almost ready to upload to FOG. The last step is to run the system preparation too. If you closed it you can access it in:
C:\Windows\System32\sysprep\sysprep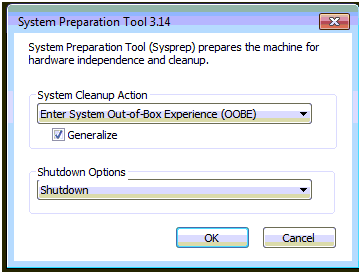
Before doing the below, I strongly suggest to take a snapshot! It's likely you will want to re-upload the image many times before you are happy with it. Plus you can then easily add updates/changes from that snapshot position.
Have the cleanup action to go into OOBE mode, and tick generalize. Set the shutdown option to "shutdown", then hit OK. Sysprep will start working. Once finished the machine will then shutdown. Now the next time it powers on we want to upload FOG before windows starts again. You can also take a snapshot before you run sysprep and then let it reboot without capturing it, to make sure everything works on the next boot up before uploading it to FOG.
Step 10: Creating the image in FOG
Select "Image management" in the FOG console. Then choose "new image". Name the image-and select "Single Partition" (NTFS Only, Resizable).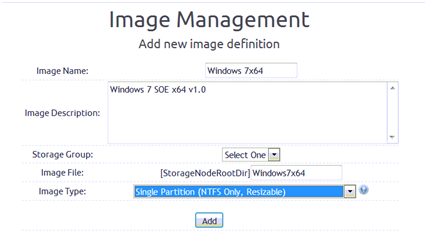
Now go to your host and reference the newly made host image to your registered host machine.
Then choose "Basic Tasks" from the menu to the left. Choose "upload Image">"Upload image". The task will start. Fog will automatically resize the partition for upload.
Now you just need to turn your virtual machine back on, and hit F12 to ensure it network boots. If it PXE boots then FOG will grab the image and upload it! If windows starts then you have not successfully PXE booted and you need to return to your snapshot- and re run sysprep. My Final image size was approx 10GB.
You are finished!
That's pretty much it. Now you can deploy the image to other psychical machines by the standard process. Thanks to the SAD2 tool drivers are a breeze, that said, Windows 7 and Sysprep will handle the majority of the essential drivers, but it's nice to get the correct drivers from SAD2.
I have deployed this on many machines. Most recent machine I was testing was a Lenovo desktop, CPU i5 quad, 4GB ram, onboard graphics and I put an SSD in it and it imaged in two minutes dead (I tried another with the original mechanical drive, and it managed two minutes- five seconds).. It finished the windows deployment in another 2 minutes approx. It auto logged on and deployed SAD2 and installed drivers in around 4 minutes, then rebooted, joined the domain and renamed. All up it was probably done in around 15 minutes max.
I hope this guide will help you in some small way. I don't think it's possible to make a 'one guide fits all' for win 7 deployment, because there are just so many variables, but I hope this might help get you started. Thanks for reading!
Please feel to ask questions- I will do my best to help answer them, or suggestions below!
Last edited by andyroo54 (2012-02-25 23:06:55)

